GEM-BOOKS FAQ
Payroll Configuration - What to Verify Before Producing CCQ Payrolls
1. Payrolls, Configurations, Configurations
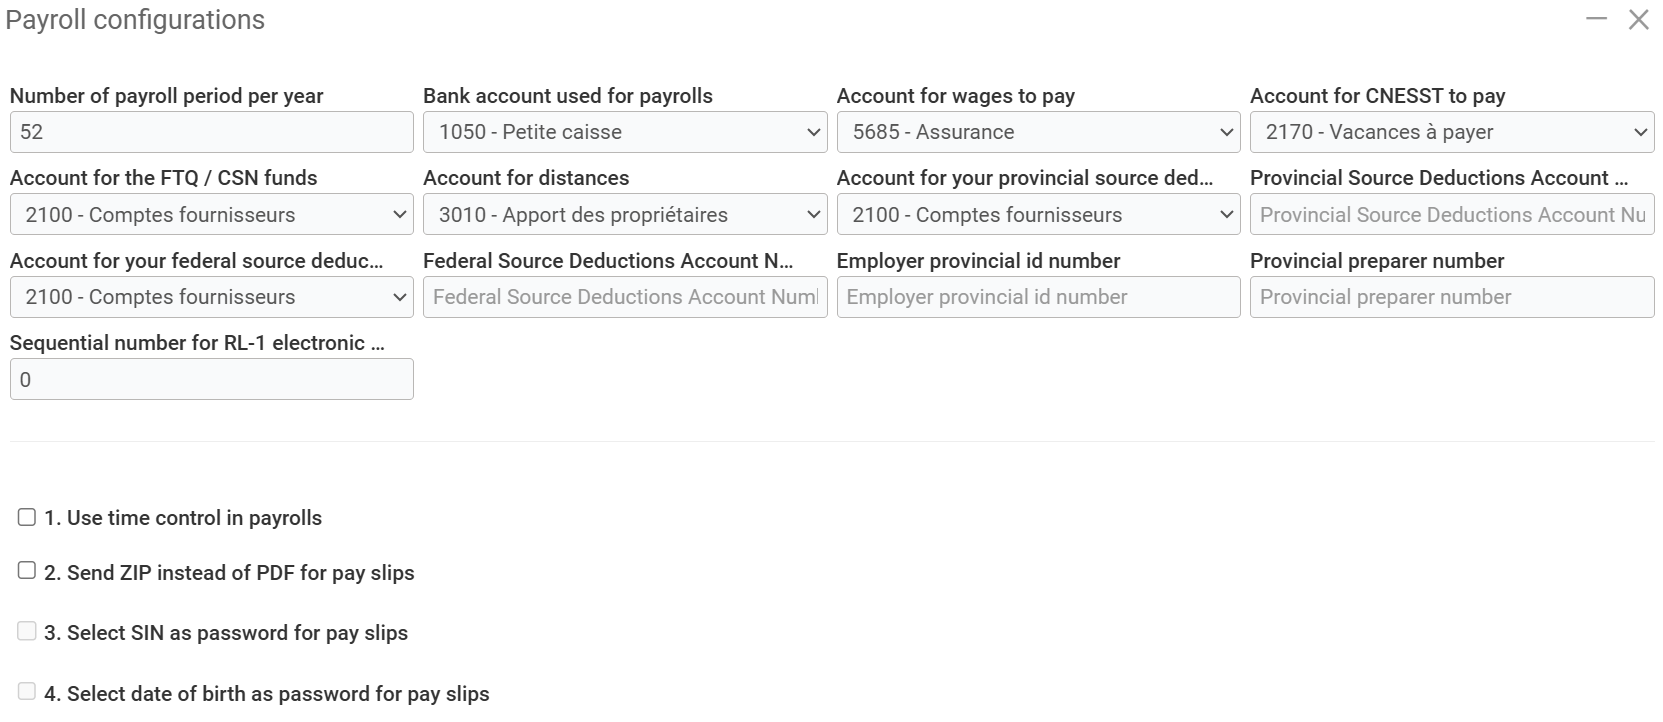
Make sure you enter all the required accounts, so that payroll transactions are created in the correct accounts.
The number of pay periods is important to enter, as GEM-BOOKS calculates annual income for tax purposes based on this number.
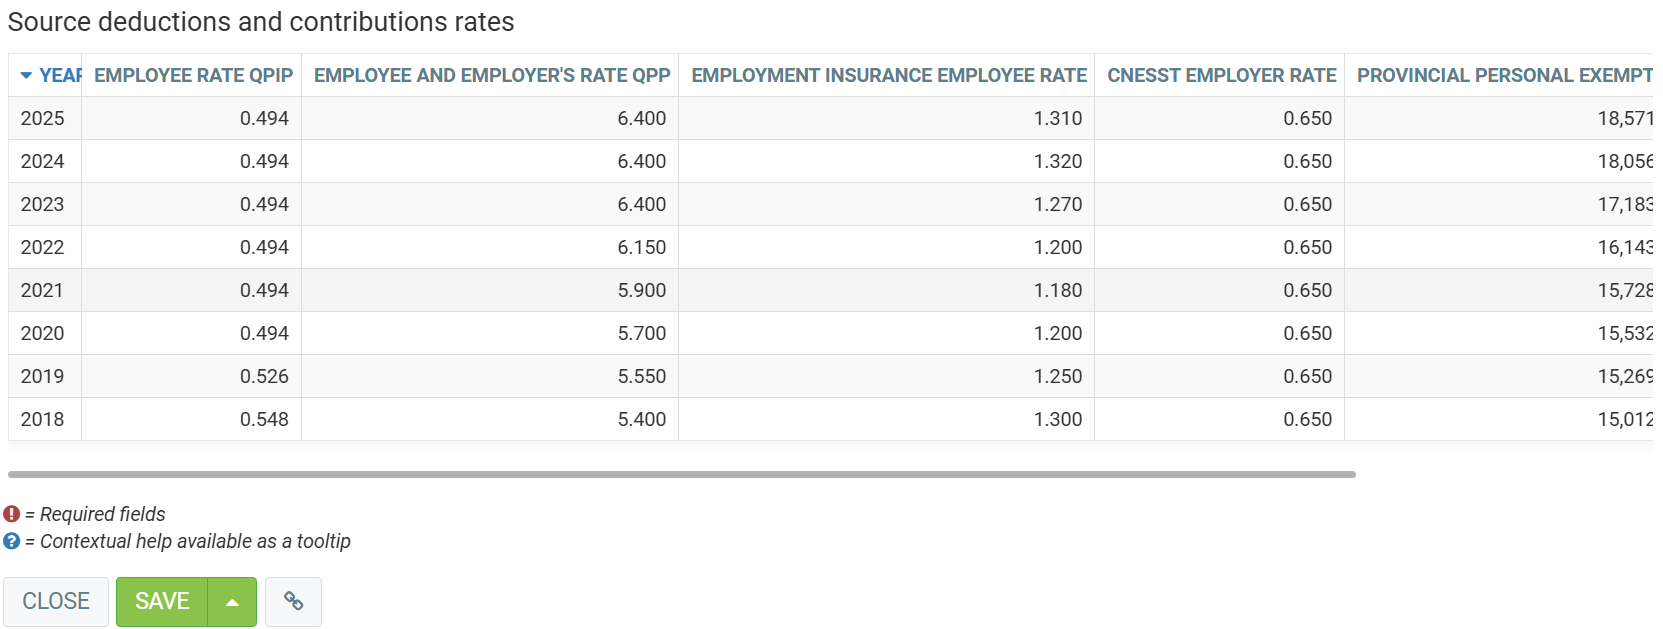
For example, if an employee's pay is $500 for the current pay and the number of pay periods per year is 52, Actif will understand that the employee has an annual salary of $26,000. Under these configurations, you'll see a “Payroll deduction and contribution rates” table. This table shows government rates by year. It is advisable not to modify these figures, as they are governed by the government.
In the payment configuration, go to Payrolls > Configurations > Configurations.
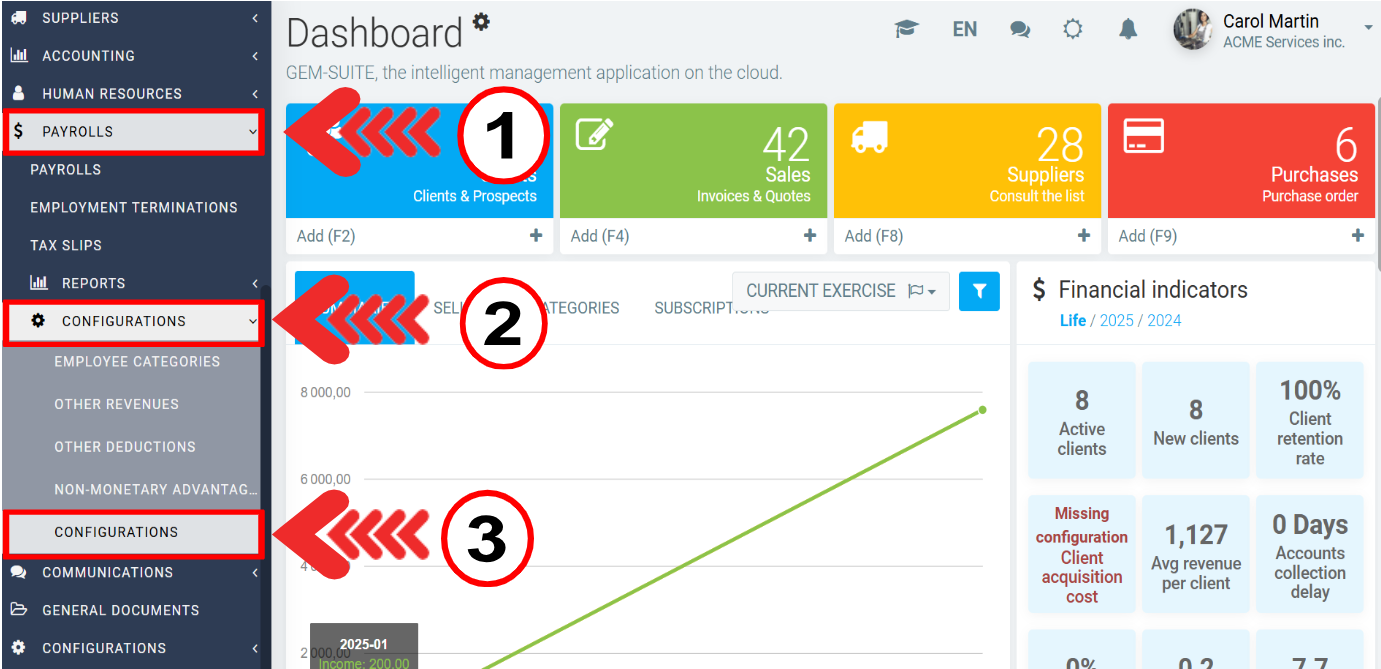
In the Payroll Configurations page, you have several options.
Other Types of Income
Click on Payrolls > Configurations > Other revenues.
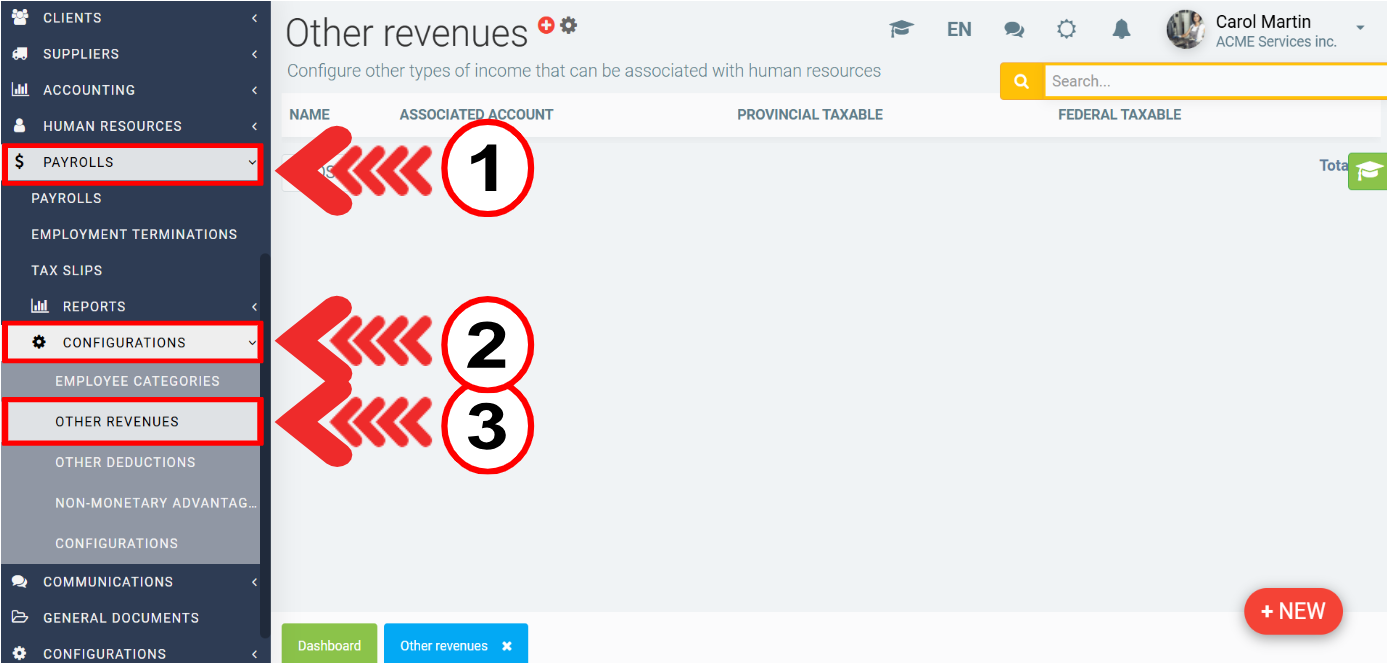
If you want to add other types of income to your payroll, this is where you set them up (for example, for mileage or tips). You'll be able to decide whether or not the employee pays tax on this type of income, and to which accounting account it is associated. For example, mileage will generally be tax-free. You can also configure a box for Relevés 1 and T4s for each type of income. If these boxes are left empty, the income will be considered as standard income when these reports are generated. 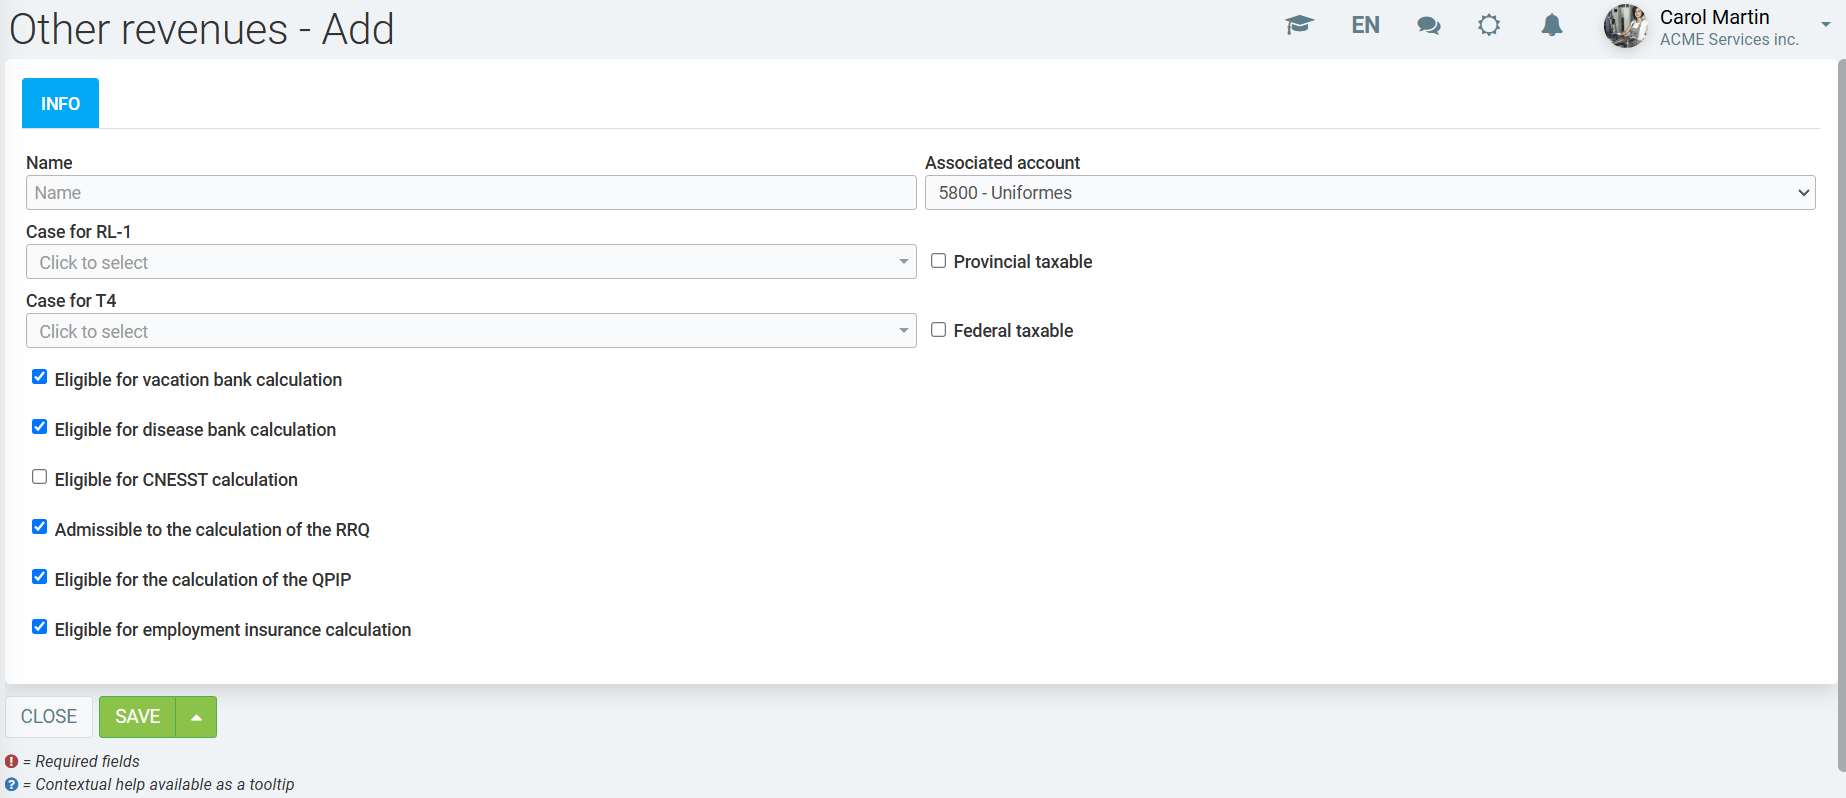
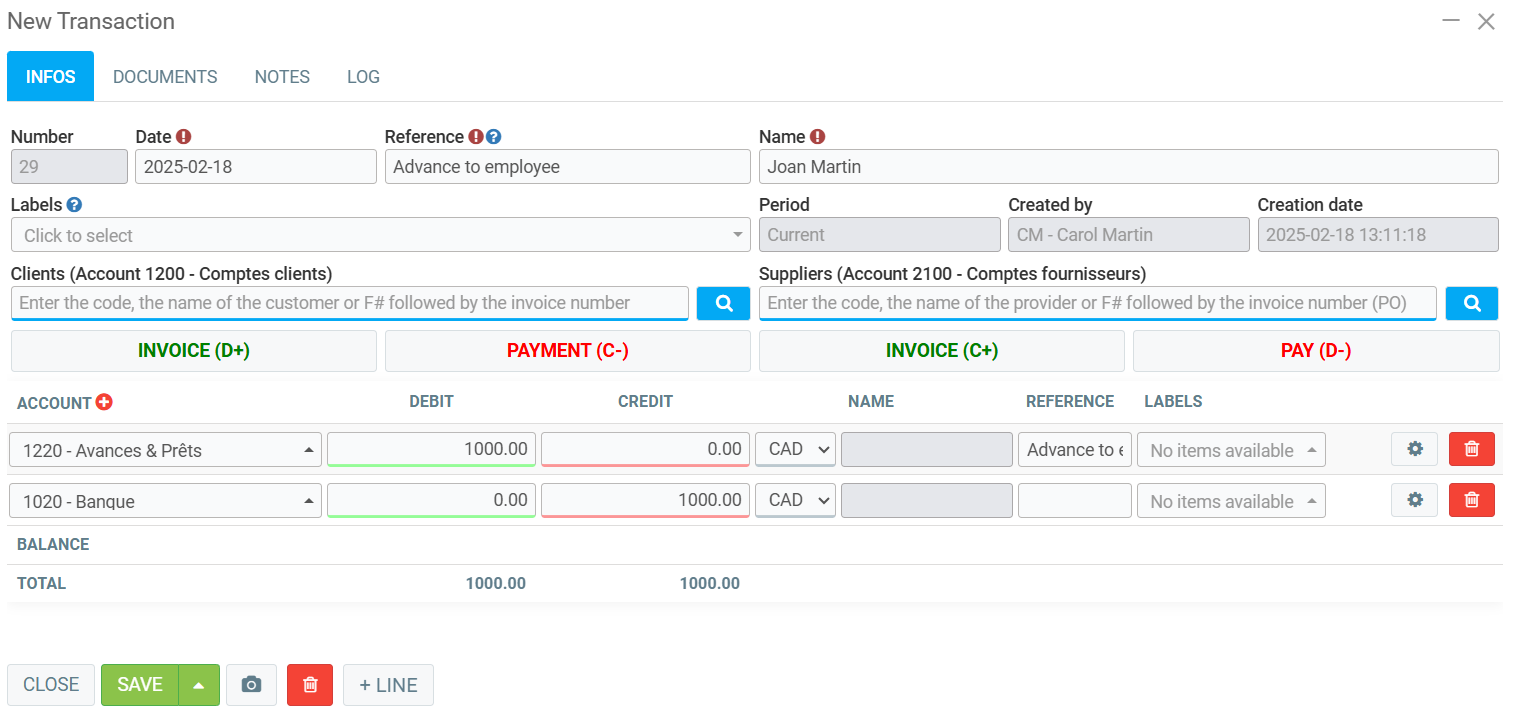
General Ledger Advance
Click on Accounting > New transaction.
Select an asset account (e.g. 1055 - Advance to employee) and make it non-taxable.
- Make a deposit or cheque
- Make a general ledger entry
- In the reference, enter the employee and payroll number (optional),
- Enter a label: to track advances by employee with a single GL code. Alternatively, create a GL for advances by employee.
- Enter the transaction
Click on Save and Close.
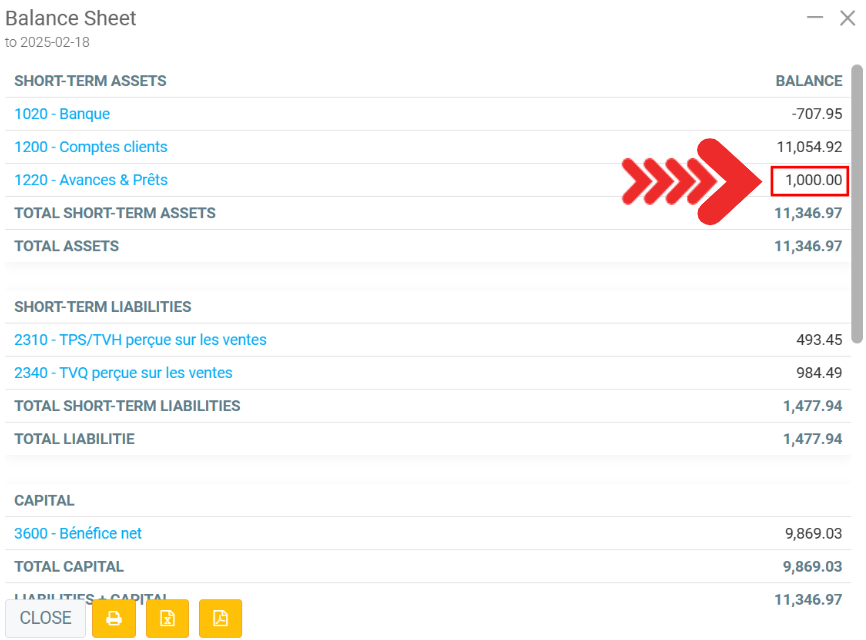
Validating the Advance Transaction
Go to Accounting > Report > Balance sheet. In the balance sheet window, click on Send.
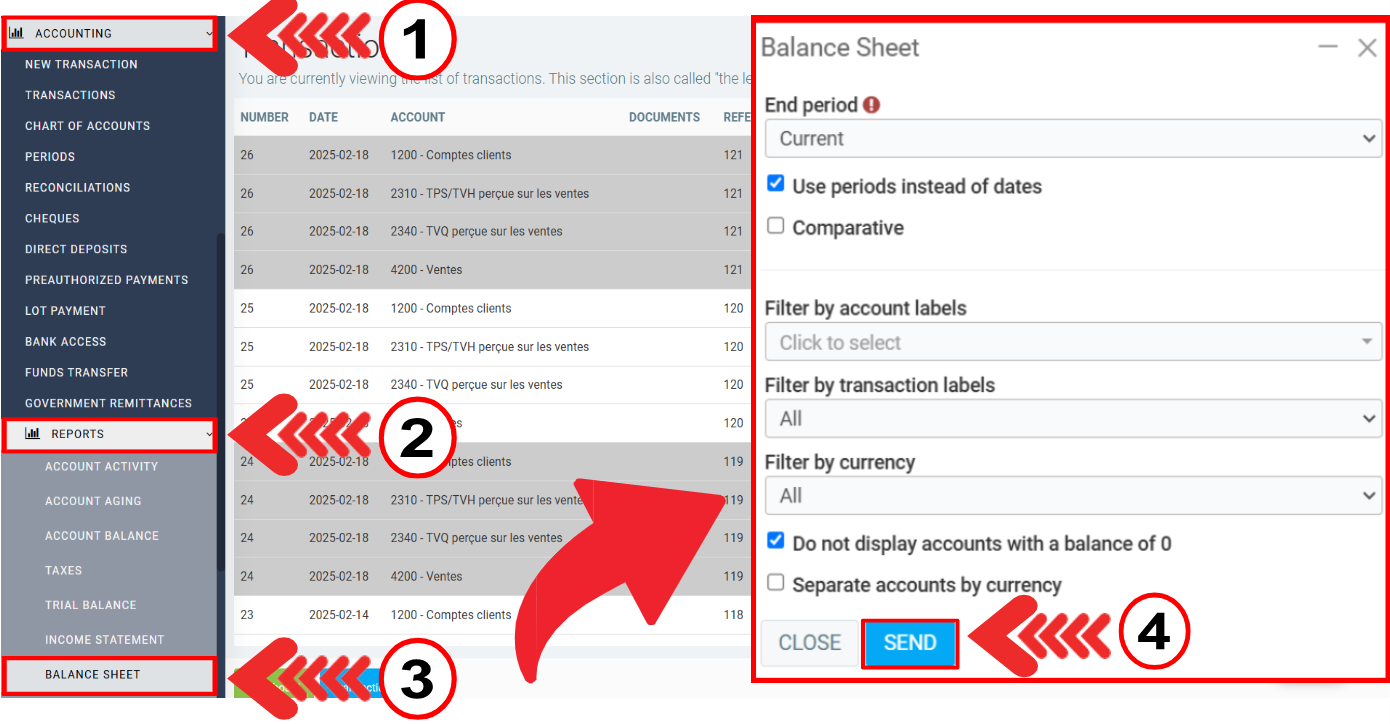
The advance should be reflected in the balance sheet as an asset, as shown below:
Other types of deductions
As with other types of income, it is possible to set up additional deductions, such as alimony* or RRSPs. For a deduction, it is possible to configure whether it is calculated annually, by the hour, or on a percentage of gross salary. When configuring the payroll of a human resource in the next step, you can enter the amount in money or as a percentage, depending on the configuration specified here. There's also a checkbox to indicate when the employer is the one paying the amount instead of the human resource.
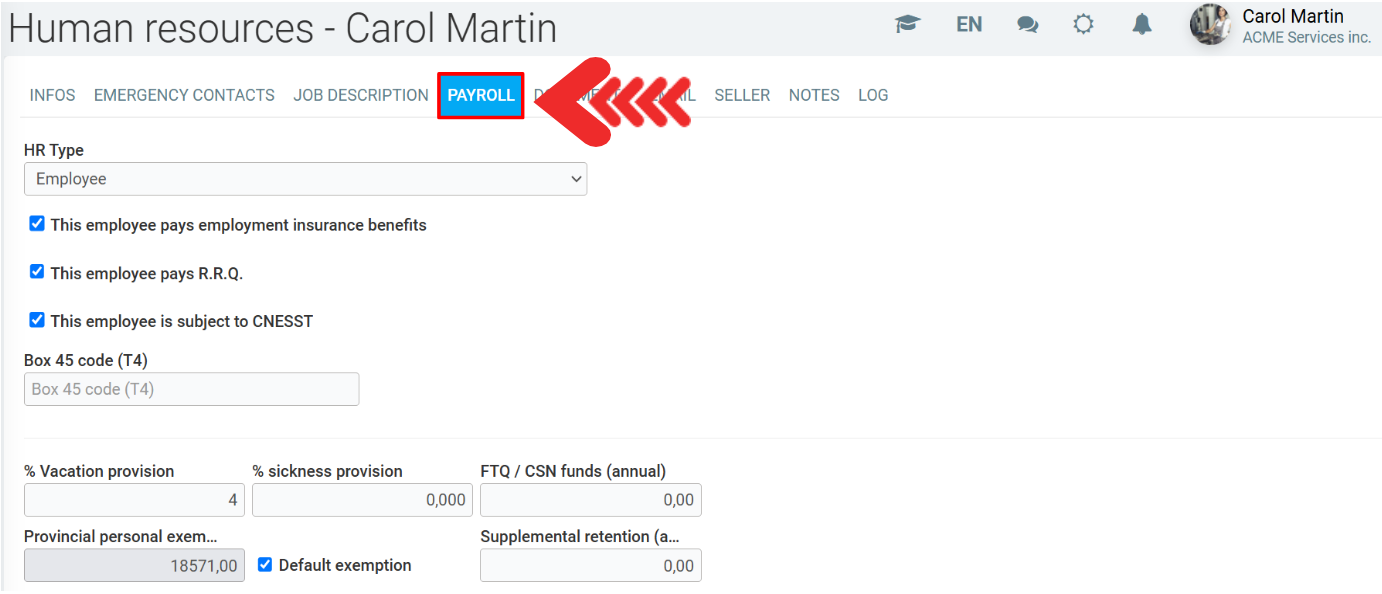
In the payment configuration, go to the Human Resources > Human Resources menu and select the desired record.
Then click on the Payroll tab.
Click on +New in Other deductions.
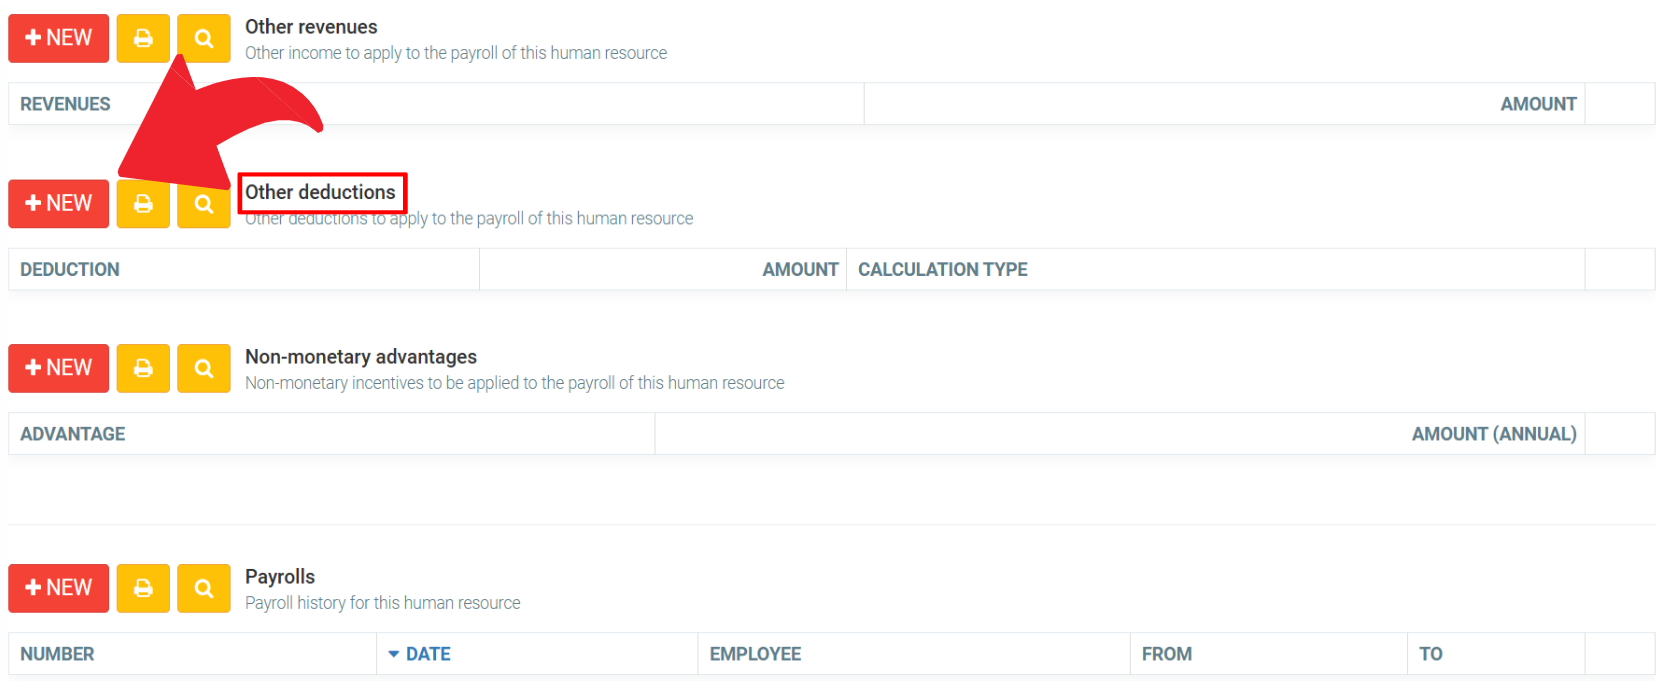
You'll then see a drop-down menu allowing you to choose one of the deductions you've set up in the configurations. Once you've chosen the deduction you want, all that remains is to select the amount, according to the type of calculation specified in the configuration of the chosen deduction.
When you click on +New, you must fill in the following fields:
- Deduction
- Amount
- Calculation type (Annual amount, Percentage of gross salary or Amount per hour)
Click on Save and Close.
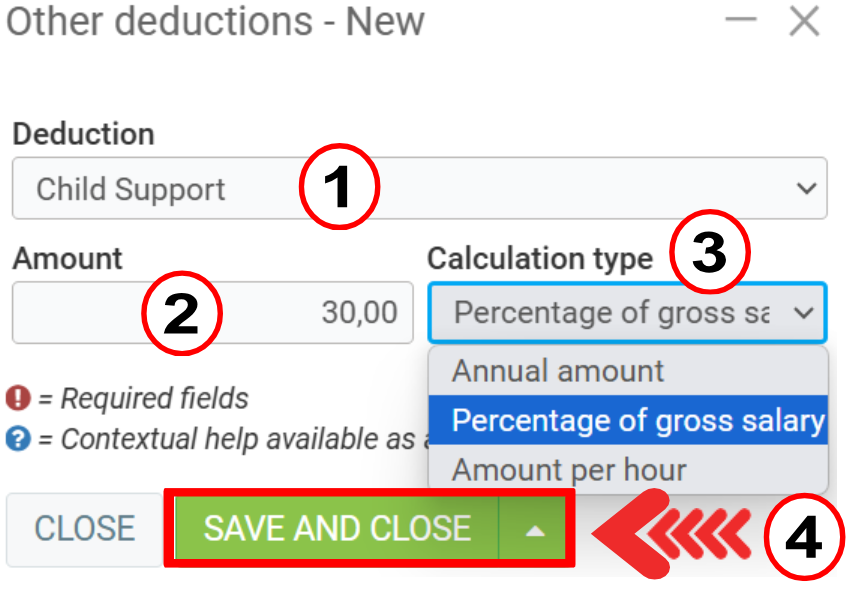
For a fixed-amount support payment deducted from each paycheck, use Annual amount. If you want $200 taken from each paycheck, enter $5200 for a bi-weekly paycheck.
Read more about how to set up deductions in the following article: Generate a Payroll for One or All of My Employees
After that, when you go to run a payroll with this human resource, you'll see the deduction automatically added to the payroll with the specified calculation.

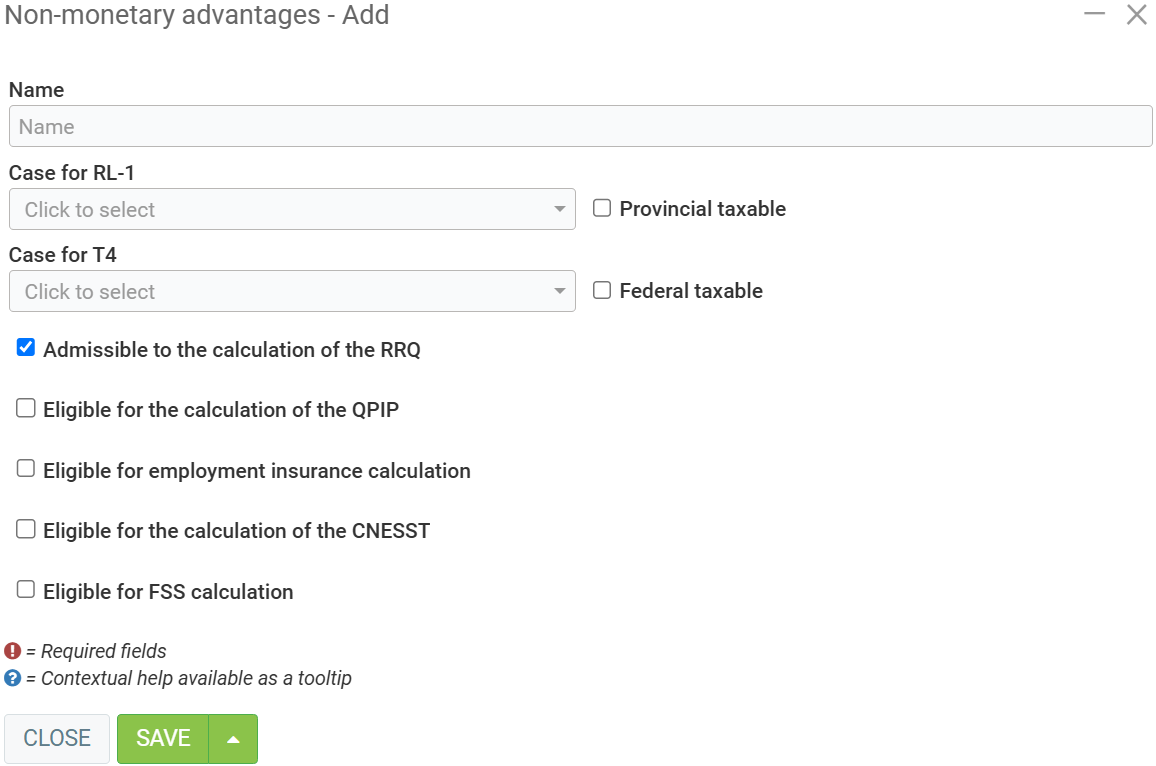
Non-monetary Advantages
If you'd like to add non-monetary benefits, such as car rentals, this is where you can set them up. Non-monetary benefits mean that the human resource is taxed on the value of the benefit.
Click on Payroll > Configurations > Non-monetary advantages> +New.
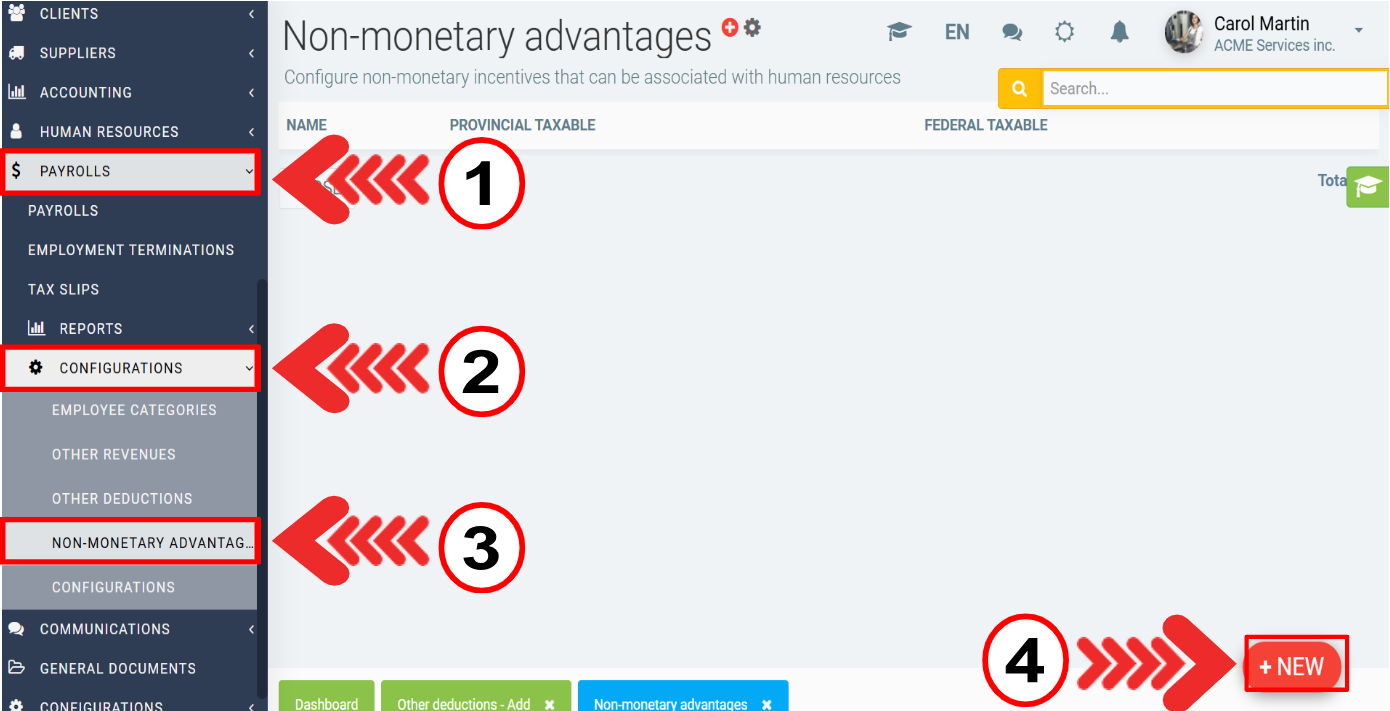
Please enter the following information:
- Name
- Case for RL-1
- Case for T4
Check or uncheck the following options:
- Provincial taxable
- Federal taxable
- Admissible to the calculation of the RRQ
- Eligible for the calculation of the QPIP
- Eligible for employment insurance calculation
- Eligible for the calculation of the CNESST
- Eligible for FSS calculation
Click on Save.
Employee Categories
This section defines the possible categories of employees in your company, for example, sales, administration, production, etc. Each employee category can be associated with a different expense allowance, commission and benefits account.
By default, GEM- BOOKS has created an “Employee” category, so if you don't want to pay your salaries into separate accounts, you can simply associate the right accounts with this employee category. You'll also notice that the trash can at the end of each line is blocked if an employee with access to a payroll has this type of category associated in his file. If you wish to remove it, you must first remove the association in the employee's file. In addition, under the Configurations tab in this section, you can configure income, deductions and non-monetary benefits for this employee category. This will ensure that all human resources with this employee category will have these configurations automatically.
This is particularly useful when you have several employees with the same income/deductions to configure, as it allows you to configure it once here, and not have to do the next step in each human resources file.
To create new employee categories, go to Payrolls > Configurations > Employee categories > +New.
When creating a new one, enter the following information:
- Employee category: Enter the name of the category. This will be used to associate it with a human resource, and will be visible at payroll time. Tip: Use the trade name you select in the CCQ tab.
- Salary, Benefits and Commissions: Accounting account to be used for this category.
- This category has a CNESST rate different from the standard: If the category does not use the same CNESST rate as the configuration in the payroll parameters, please check this option and a field for entering the rate will be displayed.
Click on Save.
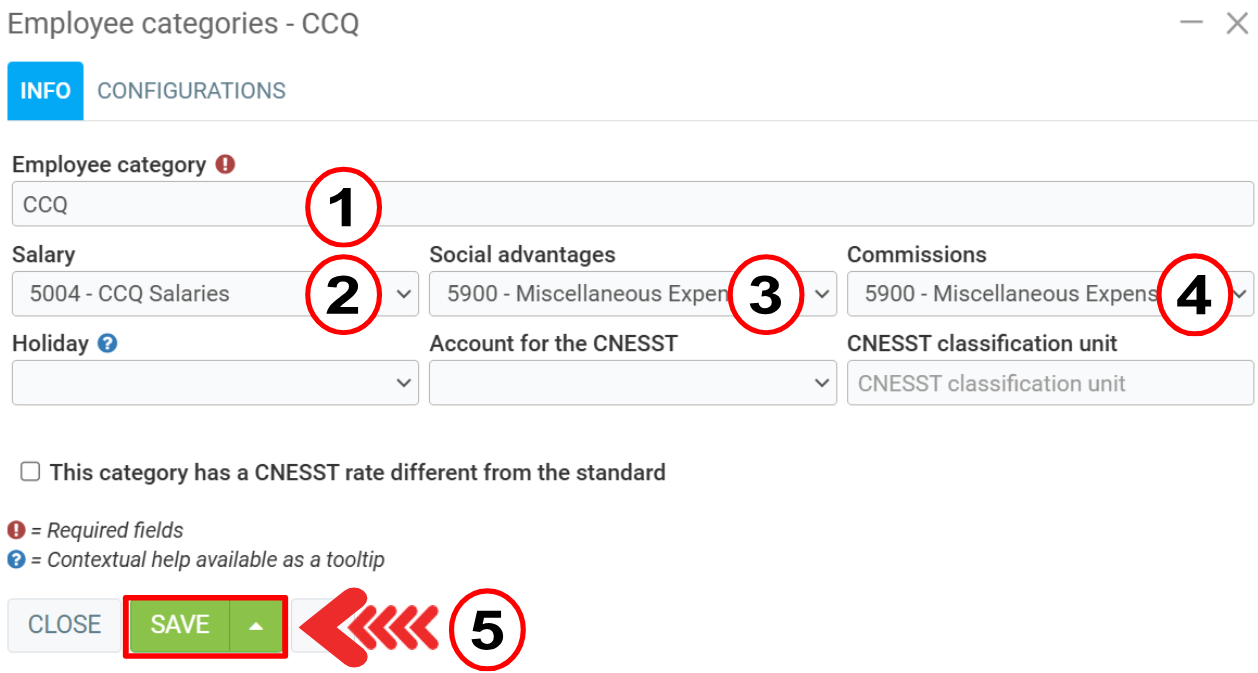
Next, go to the Configurations tab and click on +New and insert Other revenues, Other deductions and Non-monetary advantages.

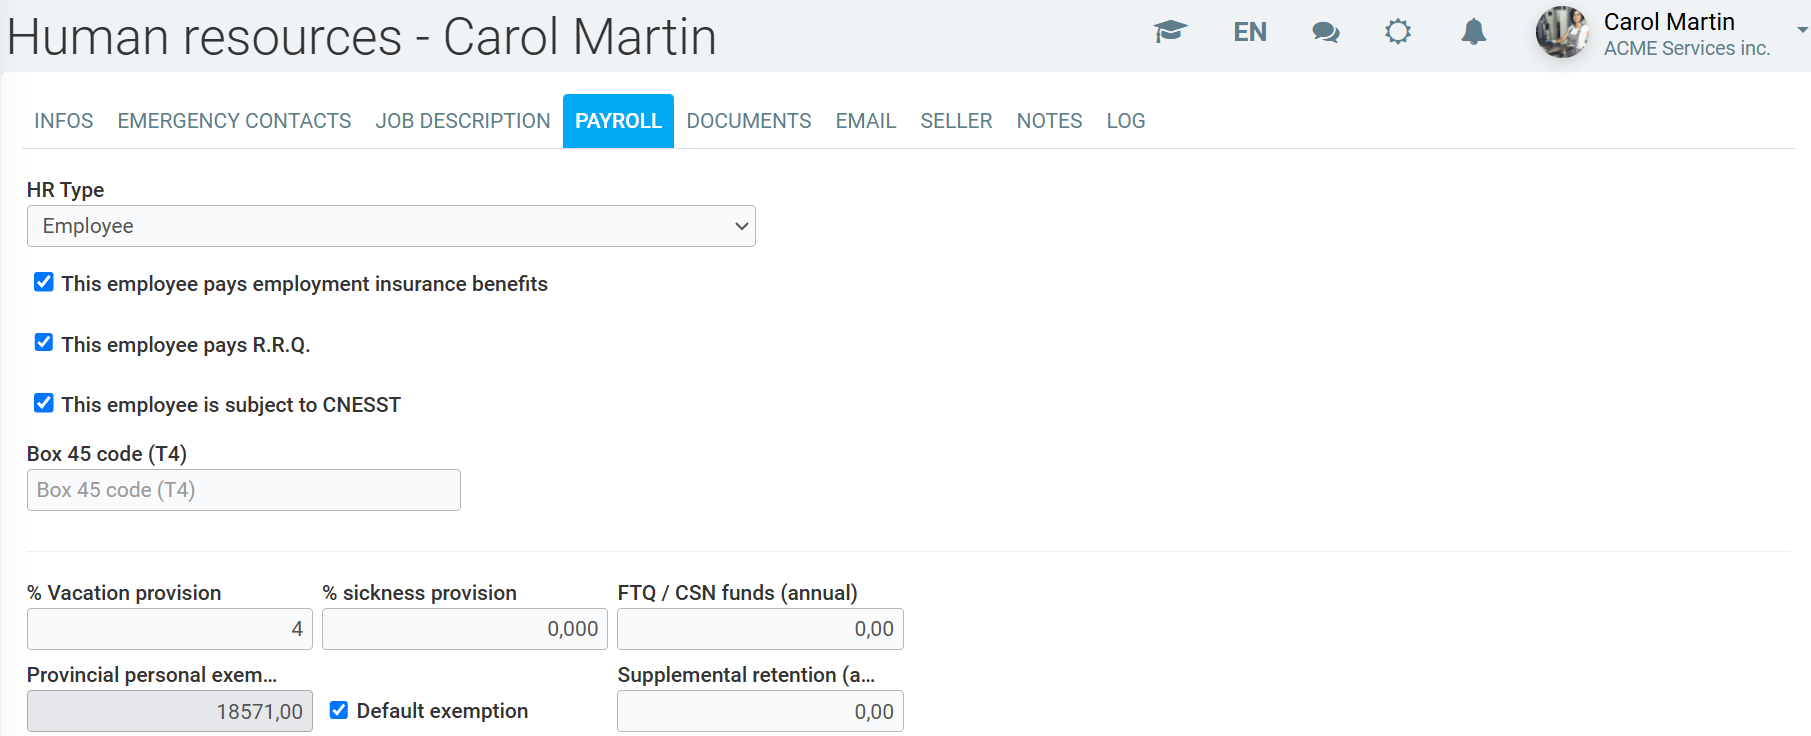
2. Human resources, Payrolls tab
First, select the type of human resource at the top, if you have not already done so. If you choose 'Freelancer', the employee will not receive a payroll from the system, but will be used in the purchasing module in the 'Call for billing' section. For the employee to receive a payroll, the type must be set to 'Employee'. Several fields will then appear, all of which must be filled in. Enter the employee's hourly rate, employee type or other income/deductions. Note that an employee may have to split his time in % over two employee categories, so that the financial statements reflect this information. For personal exemptions, it is normally preferable to click on the 'Default exemption' options. This way, the employee will have the government's default exemptions. You can, however, add a supplement in the 'Additional deductions' boxes if necessary.
This employee pays unemployment insurance: Check this box if your employee has to pay unemployment insurance. If the law stipulates that an employee does not have to pay, for example, if he or she holds a certain percentage of the company's shares, leave this box unchecked.
This employee pays Q.P.P.: if the law states that this employee does not have to pay Q.P.P., for example because of age, leave this box unchecked. It's possible to have different hourly rates, useful in cases where your employee may be paid time-and-a-half, double time, etc. Since unemployment insurance law requires you to know the time worked by an employee in hours, you must now enter the normal number of hours and a normal hourly rate. If an employee is paid a fixed amount per week, enter a number of hours and an hourly rate that corresponds to the employee's salary.
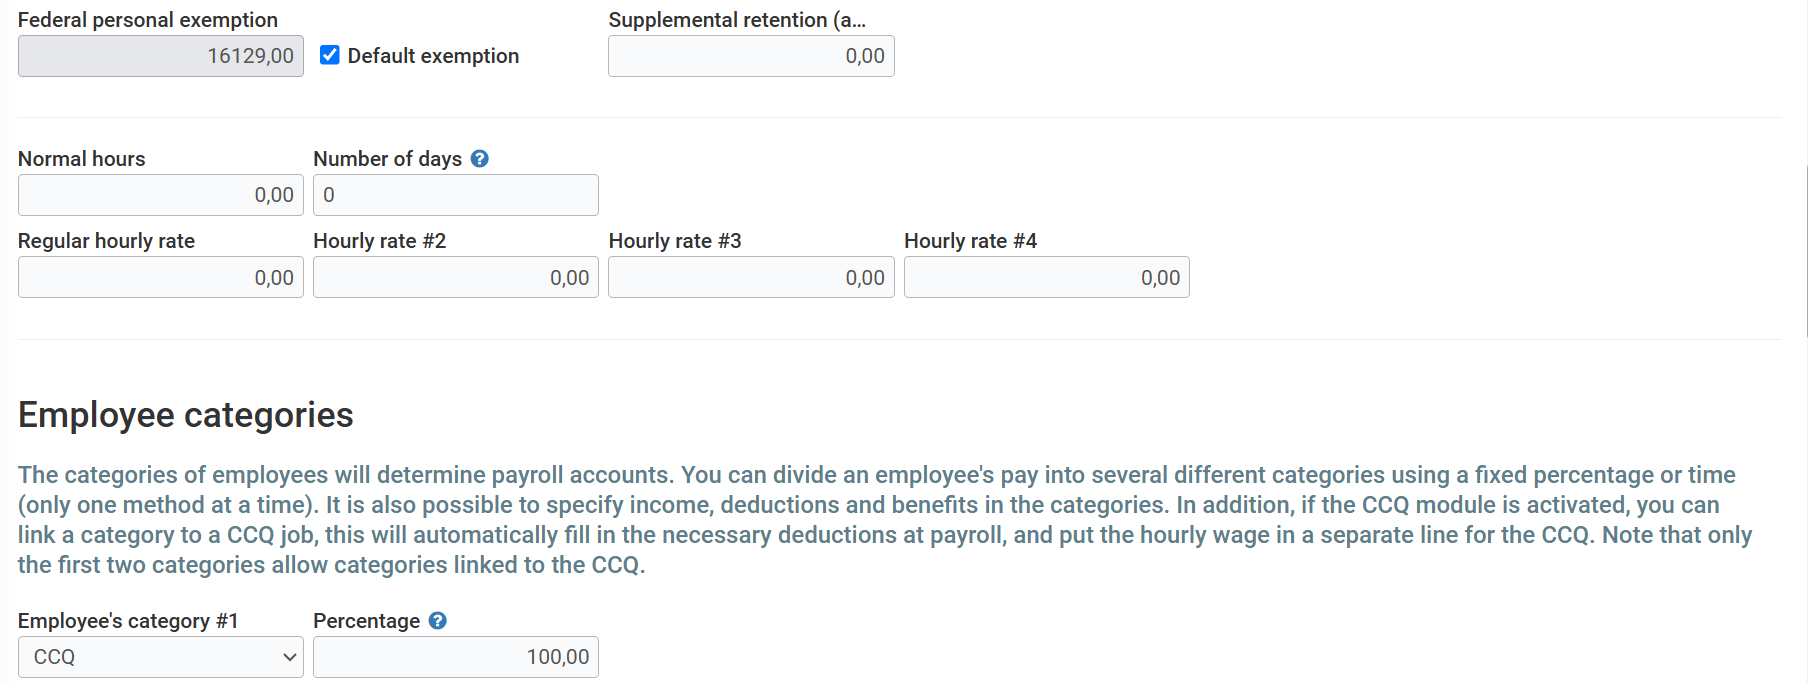
At the bottom of the window, you can associate the other types of income, deductions or non-monetary benefits you configured in the previous step. All the income/deductions you enter in the employee will be proposed to you at the time of payroll. You are free to modify these deductions at the time of payroll. If the selected employee category has non-monetary income, deduction or benefit configurations, it is not necessary to reconfigure them in the human resource master record. The configurations entered here are only for the human resource concerned.
In the payment configuration, go to Human Resources > Human Resources and select the desired master record.
Then click on the Payroll tab.
3. Payroll
You're now ready to make payrolls on Actif! Open the Payroll menu and click on +New at the bottom of the list. If an error message appears, it means that a configuration has not been correctly completed. The error will specify where the problem lies.
When naming your payroll, we recommend something like 1801 for the first payroll of 2018, 1904 for the 4th payroll of 2019, etc. When you make a payroll, a transaction of this type will be created automatically for you;
To DEBIT
SALARY EXPENSE BY EMPLOYEE CATEGORY
SALARY EXPENSE BY EMPLOYEE CATEGORY
SOCIAL BENEFITS (employer costs) BY EMPLOYEE CATEGORY
SOCIAL BENEFITS (employer costs) BY EMPLOYEE CATEGORY
To CREDIT
CNESST TO PAY
QUEBEC INCOME PAYABLE (Including provincial income tax, QPP, HSF, QPIP)
REVENU CANADA À PAYER (Including federal income tax, unemployment insurance)
SALARY PAYABLE (includes all salaries)
MISCELLANEOUS PAYMENTS (Optional - if you've set up FTP, Pension, etc.)
Also, for each of your employees paid by cheque and for all other employees who receive direct deposit, there will be this transaction:
IN DEBIT
SALARY TO BE PAID
To CREDIT
BANK
Posted
9 months
ago
by
Bianca da Silveira De Amorim
#2354
268 views
Edited
9 months
ago